Crosshair Region Sharing
GP5 version 5.0.40.63 or later utilizes a crosshair region selector to draw regions. This is a new method of region drawing that greatly improves your ability to share multiple sized regions for one or more applications, hide regions, and use multiple monitors. This article explains how to use the crosshair method.
First, Open GP5 and login with your credentials. Then choose your room, join the meeting, and click Share Screen button in upper right corner. See screenshot below.

Clicking the Share Screen button in the toolbar will bring you into the Share Screen Settings (SSS) mode and minimize the GP5 interface. The default region when you are in this mode is full screen on your primary monitor. You will see a
dashed green outline with blue handles around the primary monitor, a
crosshair region drawing selector tool with instruction box, and the
SSS dialog box.
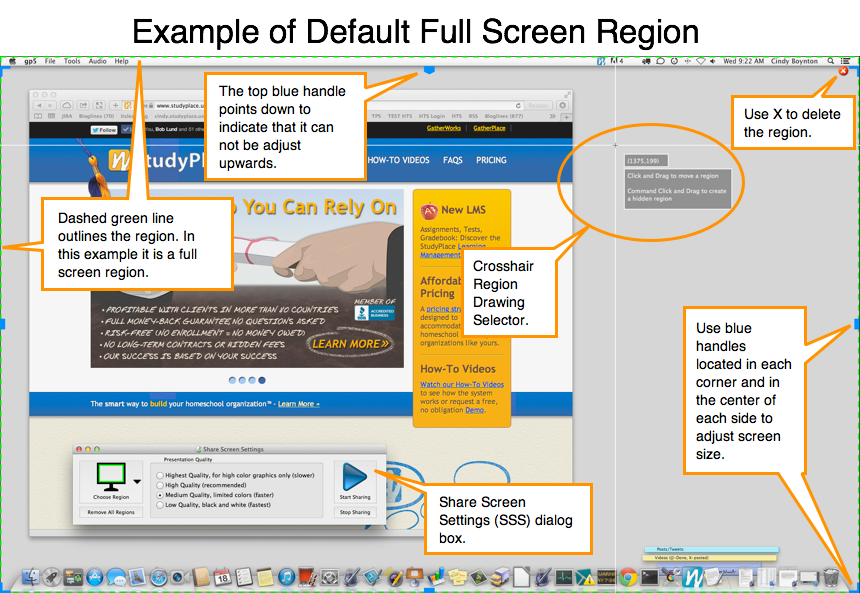
Full Screen with Dashed Green Region Outline
- The dashed green outline indicates that you are setting up your region to share with guests. The outline will become a solid green line when you are done adjusting the region and when you start to share the region.
- The blue "handles" in the corners and in the center of the four sides can be used to adjust the size of your region in or out to create a new customized region size.
- To adjust the size of the region, mouse over to a blue handle, click on it and drag it to where you want it.
- The top blue handle is shaped like a down arrow to indicate that the top of the region can not extend upwards; only down.
- The X in the red circle is located in the upper right corner of the default full screen region and can be used to delete the region.
- If you delete the default full screen region, the dashed green outline will disappear and the primary monitor will be covered in a mask. Use the crosshair region selector to draw a new region.
- When you are satisfied with your region set up, click the Start Sharing button with the blue arrow in the SSS dialog box.
See screenshot below.
Crosshair Region Drawing Selector
If you are in the default full screen region:
- You can use the crosshair selector to pick a point to grab the region (depress the mouse so that the cursor changes to a hand image) and drag it to the desired location. When you have it in place, release the mouse.
- You can also draw a hidden region, by using Command click and drag (on Mac) or by right clicking and dragging (on PC) to create a region. (The hidden region will be outlined in red on the host's monitor, but guests will see a solid blue region when the screen is shared.)
- When you are satisfied with your region set up, click the Start Sharing button with the blue arrow in the SSS dialog box.
See screenshot below.

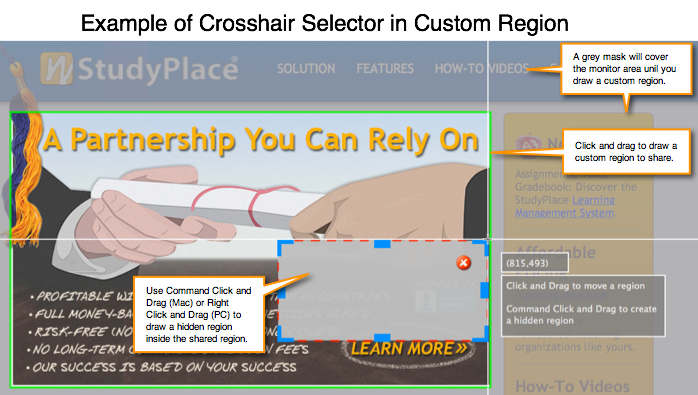
If you have deleted the default full screen region:
- A grey mask will cover the monitor area. Use the crosshair selector to draw a custom region by clicking and dragging the mouse.
- Draw a hidden region within the shared region by using the Command (Mac) or Control (PC) buttons while you click and drag to create a region. The shared region will be outlined in green on the host's monitor while the hidden region is outlined in red. (When you start sharing the guests will see the region that is outlined in green with a solid blue shape over the hidden area.)
- When you are satisfied with your region set up, click the Start Sharing button with the blue arrow in the SSS dialog box.
See screenshot below.
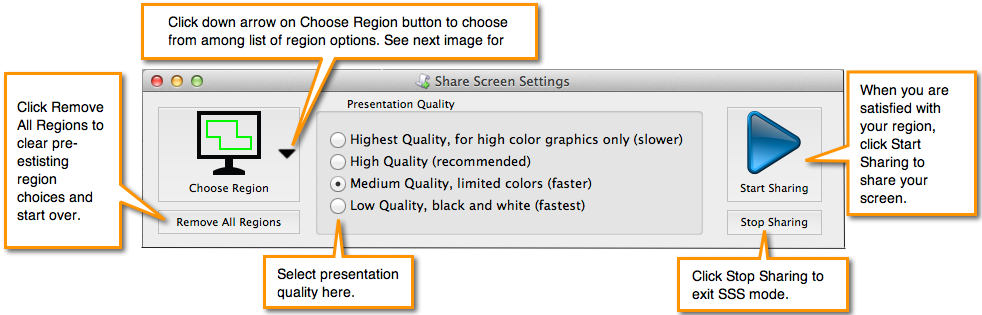
SSS Dialog Box
- When you are satisfied with the region set up, click the Start Sharing button with the blue arrow to begin sharing.
- For quickest route to sharing your screen, simply use the default full screen region and click Start Sharing.
- To exit the SSS mode, click Stop Sharing button or your escape key.
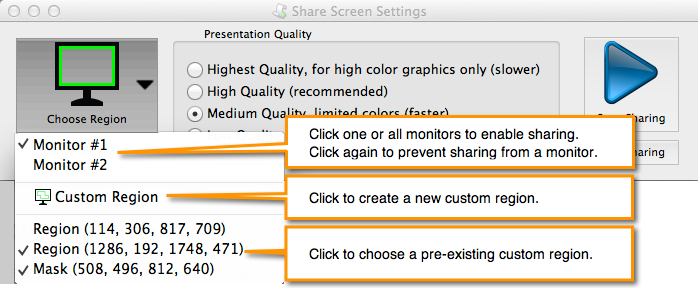
- To choose a pre-existing custom region or a monitor, click the down arrow next to the monitor image on the Choose Region button. This will show you a list of your monitors, a Custom Region option, and a list of any pre-existing custom regions. As you mouse over each option in the drop down list, notice the the monitor or region will be outlined in blue. Make a selection by clicking the option which will add a check mark next to it. If you want to share more than one monitor, add a check mark next to each one you want to share.
- Use the Remove All Regions button, to delete the regions. This will put a mask over the monitors you have selected and allow you to use the Crosshair selector to draw a new region to share.
- Select your presentation quality by clicking the radial buttons next to the quality setting you desire. The default setting is Medium quality.
See screenshots below.